Plaster Cast Dungeon
Posted by

 MortiS-the-Lost
–
 MortiS-the-Lost
–

Long has been my quest to build versatile 3D dungeon terrain and it probably won't surprise you that my converted MageKnight 3D dungeon was not my first attempt (and probably won't be my last either)
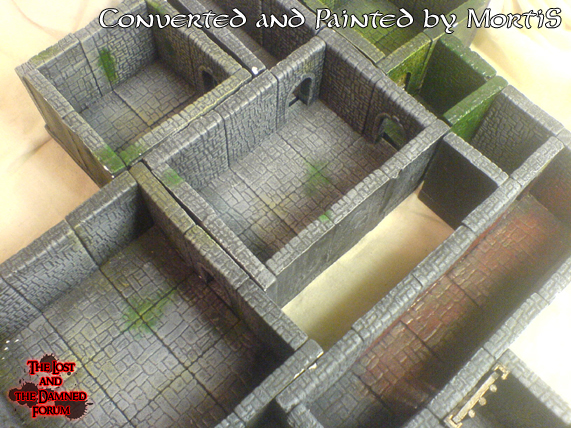
This is one of my earlier attempts to build a realistic 3D dungeon, built circa 2002 at a very slow rate. The pieces mostly saw use in games of Mordheim as a Catacombs section adjacent to a table full of ruined medieval and Tudor-style buildings that represented the city above. Once or twice I used it for a few short WFRP sessions but I never built enough sections to use it for a full length dungeon adventure. I came across the plaster dungeon when I was moving house and took a few pictures before I packed it away again with the view to writing a little about it for the forum, more than a year and a half on I've finally got round to editing the photos and doing the writing
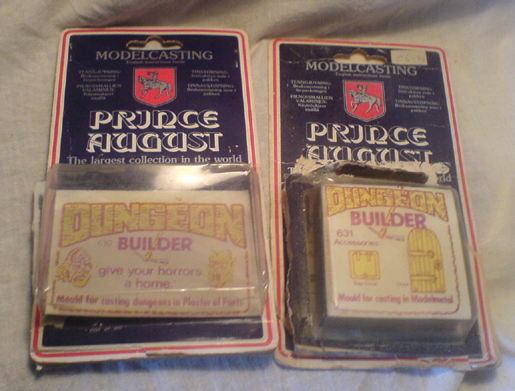
The dungeon is made from plaster cast in a set of moulds made by an Irish company called Prince August. The mould set is called Dungeon Builder and while Prince August appears to still be around today, the Dungeon Builder moulds have long since gone out of production (the set was already long out of production when I discovered them at the back of a shelf covered in dust in a model and doll's-house shop in Eastbourne when I was visiting my sister in the summer of 2001). I ended up with 2 sets of moulds from the range, 1 contained 3 1-piece moulds which makes the floors, walls and doorways and is designed to used with plaster, (I say 1-piece but they did come with a plastic lid – more on that later) while the 2nd is a 2-piece lead-casting mould to make a door and a trapdoor (I never did use the lead casting mould) It seems Prince August also did another set of led-casting moulds that made torches and other items, there may have also been other sets of moulds in the Dungeon Builder range I'm not aware of.
^the art work on packaging is just classic and typical of the period the moulds are from. The Dungeon Builder moulds probably once shared a shelf with the Citadel FA, FF and FS ranges and 1st edition AD&D manuals
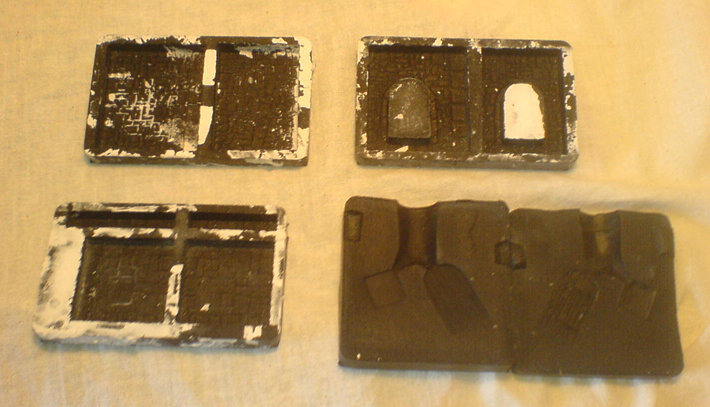
^the plaster-casting moulds for the wall (top-left), doorway (top-right) and floor sections (bottom-left). And the led-casting moulds for the doors and trapdoors (bottom-right)
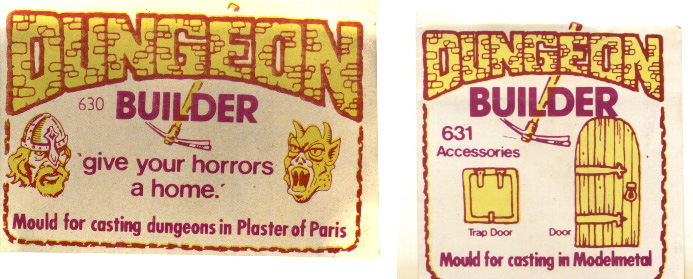
The plaster-casting moulds make 2 kinds of wall and doorway sections - with and without pillars-, square floor tiles and long and short floor pieces that match the length of the pillared and pillar-less wall/doorway sections. The idea being that you laid out the floor pieces in an interlocking grid pattern (see the scan of the instructions), gluing down only the square pieces leaving the long and short pieces loose so they could be swapped out for the wall and door sections when the dungeon was laid out for a game. This meant that (in theory at least) the set could be used in a very similar way to the MageKnight 3D dungeon, plaster however damages easily and I knew it wouldn't stand up to the rigours of constant re-arrangement (I guess Prince August intended that when a piece became damaged you just cast more). When I came to assembling my dungeon I opted to build solid room and corridor sections as suggested at the end of the instructions, reasoning they would be much stronger that way and could be used in a similar way to the Warhammer Quest tiles.
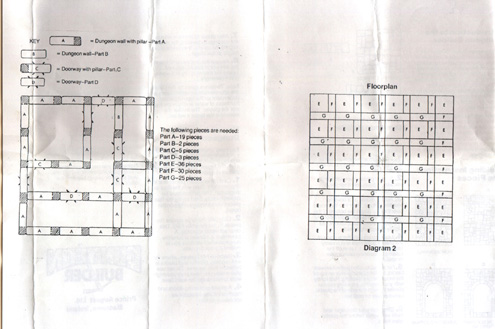
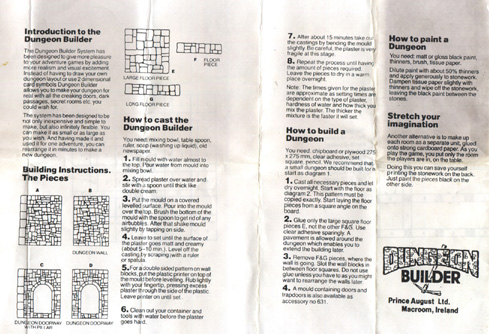
^ Scans of the instructions (click to enlarge)
One of the fist problems I ran into when I began construction was scale. The Dungeon Builder set was so old that it had been designed for 25mm figures, so the doorways were rather small compared to my 28/30mm miniatures.
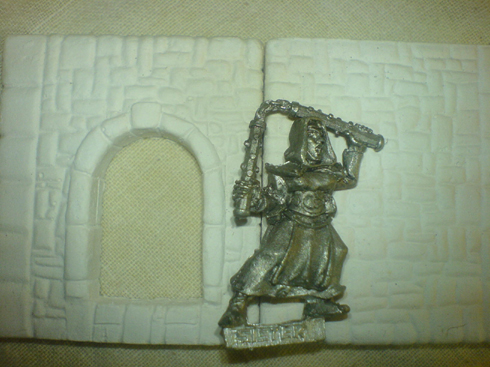
^ one of the doorways with a Mordheim miniature to give you an idea of the size
Fortunately I thought up a simple solution one night in bed - mount the wall and doorway sections on top of the narrow floor pieces and saw through the bottom of the doorway pieces, thus increasing the height of the doorways by around 8mm!
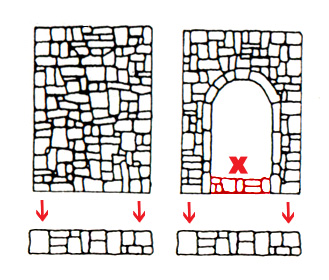
This however meant that the original doors wouldn't fit, so I had to scratch-build my own doors from balsa-wood and spare bits, but this did mean the doors turned out looking rather nice, due to the extra effort.
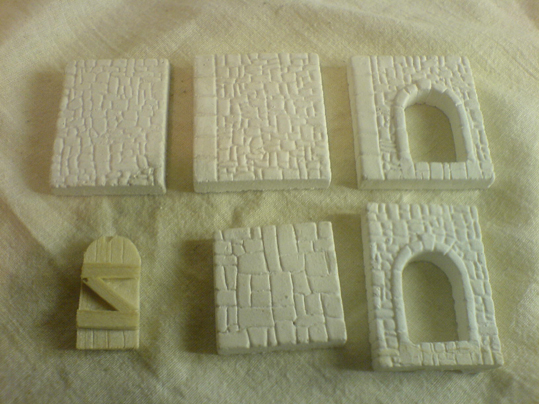
^ Several of the Dungeon Builder castings and 1 of my scratch-built doors
the other problem I had was that due to the way the moulds worked the plaster castings of the wall and door section where only detailed on 1 side. They did come with textured plastic lids that were supposed to 'print' the dungeon-brick pattern on the 'backs' but this didn't really work, so I ended up having to sit down and carve a dungeon brick texture into the plaster with a knife, once the plaster had set. Again this looked good, but was a lot of work considering the amount of pieces required to build just 1 room, so I saved time by only carving the backs of the doorway sections as they would be the only bit's you'd need detail on both sides of.
This, plus the drying time for the plaster, coupled with the fact I could never seem to get the constancy of the plaster mix quite right and some castings couldn't be used as they crumbled when I took them out of the moulds and a few accidental breakages along the way meant that it took weeks to put together the average room section. New room types would often be required for particular purposes and construction time would often delay the games I intended to use them in - eventually I abandoned the rather time-consuming project and for a few years went back to using my Advanced HeroQuest tiles for dungeon games (that is until I discovered the MK3DD dungeon sets)

^Several Rooms and connecting Corridors
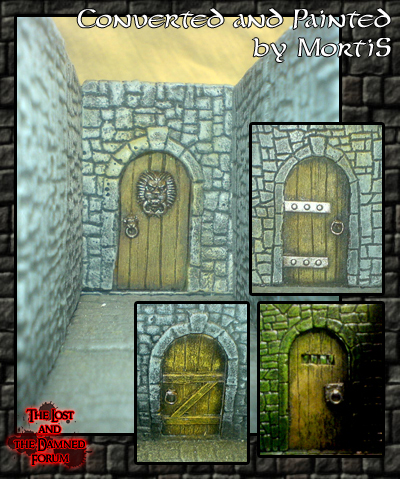
^a few of the scratch-built doors
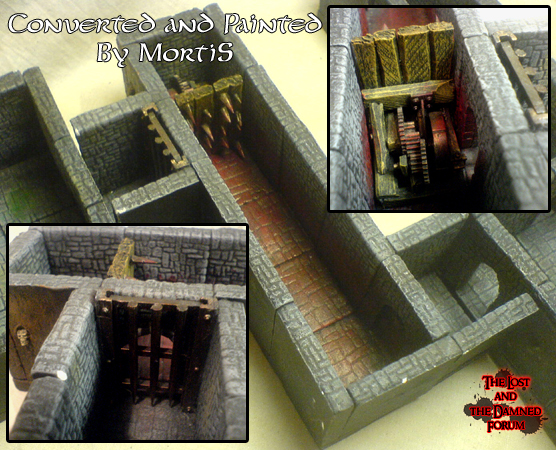
^'The Hero Crusher', my personal favorite section, an elaborate trap inspired by part of a Quake level. adventures go in, reach the locked door, try to open it and the portcullis slams down trapping them before the mechanism makes it's way down the corridor!
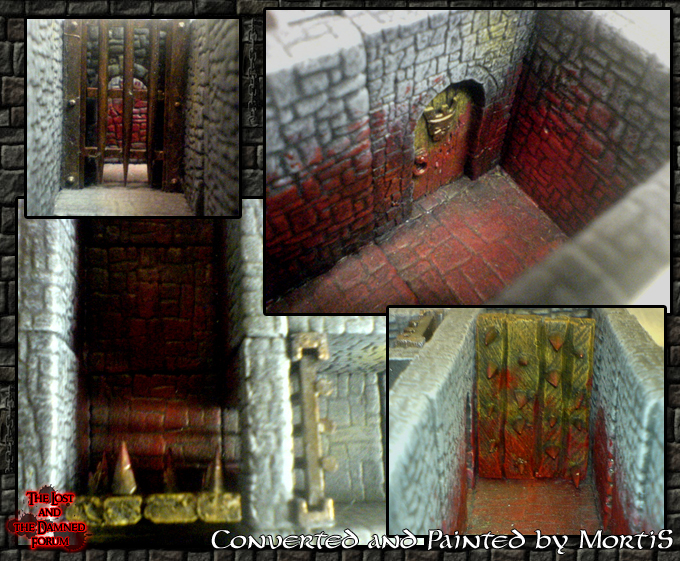
^some close-ups of 'The Hero Crusher', note the marks on the door, no doubt left by some hapless adventures trying to escape as the mechanism ground slowly closer to them!
When it came to painting I ignored the instructions rather dated suggestion of painting the plaster black and then rubbing some of with a cloth soaked in paint thinner, since I don't use enamels. The dungeon sections were undercoated in black emulsion (which the plaster soaked right up staining it a perfect black) and dry brushed in Codex Grey, followed by Fortress Grey, I then 'weathered' the dungeon with dry brushings of Bubonic Brown and used Dark Angels Green, Snot Green and Green Ink to add a little slime here and there. Some rooms got some blood splatter added using Red Gore, Blood Red and Red Ink.
The initial plan was to make a set of basic (empty) rooms of the most common shapes and sizes and a few special rooms to represent objective/quest rooms and particularly elaborate traps, obstacles and puzzle rooms. In the beginning my ambition knew no bounds and I had all kinds of sections planned inspired by all kinds of things, great pillared halls (using plaster wedding cake pillars), water sections with underground rivers and sewers flowing though them, volcanic rents in the earth crossed by rickety bridges, secret doors, moving walls, boulder taps, opening pits, stairs and multi-level rooms with support blocks for adjacent sections on higher levels. Sadly not all of this came to pass, but many of the ideas have been carried over into my current 3D dungeon project and may see the light of day yet ...

This is one of my earlier attempts to build a realistic 3D dungeon, built circa 2002 at a very slow rate. The pieces mostly saw use in games of Mordheim as a Catacombs section adjacent to a table full of ruined medieval and Tudor-style buildings that represented the city above. Once or twice I used it for a few short WFRP sessions but I never built enough sections to use it for a full length dungeon adventure. I came across the plaster dungeon when I was moving house and took a few pictures before I packed it away again with the view to writing a little about it for the forum, more than a year and a half on I've finally got round to editing the photos and doing the writing

The dungeon is made from plaster cast in a set of moulds made by an Irish company called Prince August. The mould set is called Dungeon Builder and while Prince August appears to still be around today, the Dungeon Builder moulds have long since gone out of production (the set was already long out of production when I discovered them at the back of a shelf covered in dust in a model and doll's-house shop in Eastbourne when I was visiting my sister in the summer of 2001). I ended up with 2 sets of moulds from the range, 1 contained 3 1-piece moulds which makes the floors, walls and doorways and is designed to used with plaster, (I say 1-piece but they did come with a plastic lid – more on that later) while the 2nd is a 2-piece lead-casting mould to make a door and a trapdoor (I never did use the lead casting mould) It seems Prince August also did another set of led-casting moulds that made torches and other items, there may have also been other sets of moulds in the Dungeon Builder range I'm not aware of.

^the art work on packaging is just classic and typical of the period the moulds are from. The Dungeon Builder moulds probably once shared a shelf with the Citadel FA, FF and FS ranges and 1st edition AD&D manuals

^the plaster-casting moulds for the wall (top-left), doorway (top-right) and floor sections (bottom-left). And the led-casting moulds for the doors and trapdoors (bottom-right)
The plaster-casting moulds make 2 kinds of wall and doorway sections - with and without pillars-, square floor tiles and long and short floor pieces that match the length of the pillared and pillar-less wall/doorway sections. The idea being that you laid out the floor pieces in an interlocking grid pattern (see the scan of the instructions), gluing down only the square pieces leaving the long and short pieces loose so they could be swapped out for the wall and door sections when the dungeon was laid out for a game. This meant that (in theory at least) the set could be used in a very similar way to the MageKnight 3D dungeon, plaster however damages easily and I knew it wouldn't stand up to the rigours of constant re-arrangement (I guess Prince August intended that when a piece became damaged you just cast more). When I came to assembling my dungeon I opted to build solid room and corridor sections as suggested at the end of the instructions, reasoning they would be much stronger that way and could be used in a similar way to the Warhammer Quest tiles.


^ Scans of the instructions (click to enlarge)
One of the fist problems I ran into when I began construction was scale. The Dungeon Builder set was so old that it had been designed for 25mm figures, so the doorways were rather small compared to my 28/30mm miniatures.

^ one of the doorways with a Mordheim miniature to give you an idea of the size
Fortunately I thought up a simple solution one night in bed - mount the wall and doorway sections on top of the narrow floor pieces and saw through the bottom of the doorway pieces, thus increasing the height of the doorways by around 8mm!

This however meant that the original doors wouldn't fit, so I had to scratch-build my own doors from balsa-wood and spare bits, but this did mean the doors turned out looking rather nice, due to the extra effort.

^ Several of the Dungeon Builder castings and 1 of my scratch-built doors
the other problem I had was that due to the way the moulds worked the plaster castings of the wall and door section where only detailed on 1 side. They did come with textured plastic lids that were supposed to 'print' the dungeon-brick pattern on the 'backs' but this didn't really work, so I ended up having to sit down and carve a dungeon brick texture into the plaster with a knife, once the plaster had set. Again this looked good, but was a lot of work considering the amount of pieces required to build just 1 room, so I saved time by only carving the backs of the doorway sections as they would be the only bit's you'd need detail on both sides of.
This, plus the drying time for the plaster, coupled with the fact I could never seem to get the constancy of the plaster mix quite right and some castings couldn't be used as they crumbled when I took them out of the moulds and a few accidental breakages along the way meant that it took weeks to put together the average room section. New room types would often be required for particular purposes and construction time would often delay the games I intended to use them in - eventually I abandoned the rather time-consuming project and for a few years went back to using my Advanced HeroQuest tiles for dungeon games (that is until I discovered the MK3DD dungeon sets)

^Several Rooms and connecting Corridors

^a few of the scratch-built doors

^'The Hero Crusher', my personal favorite section, an elaborate trap inspired by part of a Quake level. adventures go in, reach the locked door, try to open it and the portcullis slams down trapping them before the mechanism makes it's way down the corridor!

^some close-ups of 'The Hero Crusher', note the marks on the door, no doubt left by some hapless adventures trying to escape as the mechanism ground slowly closer to them!
When it came to painting I ignored the instructions rather dated suggestion of painting the plaster black and then rubbing some of with a cloth soaked in paint thinner, since I don't use enamels. The dungeon sections were undercoated in black emulsion (which the plaster soaked right up staining it a perfect black) and dry brushed in Codex Grey, followed by Fortress Grey, I then 'weathered' the dungeon with dry brushings of Bubonic Brown and used Dark Angels Green, Snot Green and Green Ink to add a little slime here and there. Some rooms got some blood splatter added using Red Gore, Blood Red and Red Ink.
The initial plan was to make a set of basic (empty) rooms of the most common shapes and sizes and a few special rooms to represent objective/quest rooms and particularly elaborate traps, obstacles and puzzle rooms. In the beginning my ambition knew no bounds and I had all kinds of sections planned inspired by all kinds of things, great pillared halls (using plaster wedding cake pillars), water sections with underground rivers and sewers flowing though them, volcanic rents in the earth crossed by rickety bridges, secret doors, moving walls, boulder taps, opening pits, stairs and multi-level rooms with support blocks for adjacent sections on higher levels. Sadly not all of this came to pass, but many of the ideas have been carried over into my current 3D dungeon project and may see the light of day yet ...
| Free forum by Nabble | Edit this page |
6 Comments
Re: Plaster Cast Dungeon
Re: Plaster Cast Dungeon
Re: Plaster Cast Dungeon
Re: Plaster Cast Dungeon
Re: Plaster Cast Dungeon
Re: Plaster Cast Dungeon